When you need to capture an entire webpage, lengthy document, or full conversation, standard screenshots just don’t cut it, as they can only record what’s visible on your screen. This limitation often results in incomplete or fragmented images, so you must stitch them together manually.
In this post, we’ll guide you through various methods for taking long screenshot on Windows 11/10, Mac, and mobile devices. From built-in tools to third-party apps, we’ll help you learn about how to take scrolling screenshot with ease.
How to Screenshot Whole Pages on Windows 11/10
For users looking to perform a scrolling screen capture on Windows 10 and 11, there are several methods to consider. We’ll walk you through the best options for capturing entire pages on your Windows 10/11 devices.
Use Google Chrome for Windows Scrolling Screenshot
Google Chrome provides a built-in feature that allows you to capture full-page screenshots without additional extensions or third-party software. This method is particularly useful for capturing any content that requires scrolling.
The captured screenshots are automatically downloaded to your computer, and then you can easily share or edit them through various apps. This default tool for screen capture with scrolling supports a smooth workflow for users who need to regularly capture scrolling content without any hassle.
💡 The following tutorial will teach you how to take full-page screenshots in Windows 11/10 desktop computers and laptops using the Google Chrome browser:
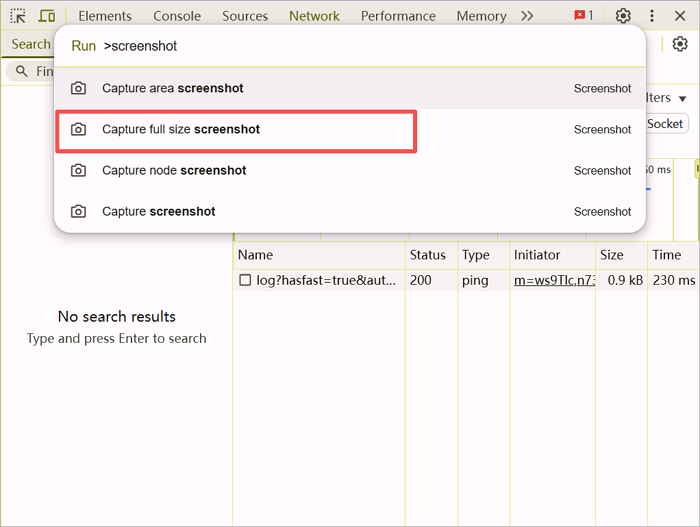
Step 1. Right-click anywhere on the webpage and select Inspect, or press Ctrl + Shift + I to open Developer Tools.
Step 2. Press Ctrl + Shift + P to open the command box.
Step 3. Type “Screenshot“ in the command box and select Capture full-size screenshot.
Step 4. The screenshot will automatically download to your Downloads folder.
Step 5. Open the screenshot from the Downloads folder and share it through email or other apps.
Scrolling Screenshot Firefox to Capture Entire Page
Like Google Chrome, Firefox also provides a built-in tool for Firefox scrolling screenshot and helps you capture a full webpage without any additional tools. You can use it to screenshot everything that appears on this internet browser’s webpage.
One advantage of the Firefox scrolling screenshot method is its straightforward approach. You don’t need to open Developer Tools like in Chrome. Instead, you can simply access the screenshot tool through the browser’s menu or by right-clicking on the page. Besides, Firefox lets you preview the screenshot before downloading, so you can easily check if you’ve captured the entire page and avoid any cropped or incomplete images.
💡 Here is how to take full-page screenshots in Windows 11 and 10 PCs:
Step 1. Open Mozilla Firefox and navigate to the webpage you want to capture.
Step 2. Click on the three horizontal lines (the “hamburger” menu) in the upper-right corner of the browser and select More Tools, then choose Customize Toolbar.
Step 3. Find the Screenshot icon (it looks like a camera) in the customization options, then drag it to your toolbar for easy access.
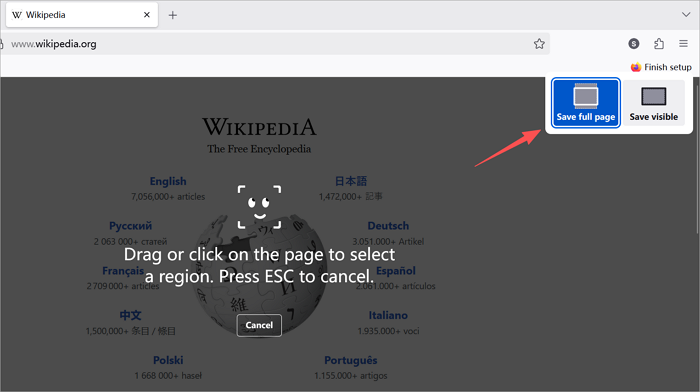
Step 4. Go back to the webpage you wish to capture and click on the Screenshot icon in your toolbar. From the options, select Save Full Page to capture the entire length of the webpage.
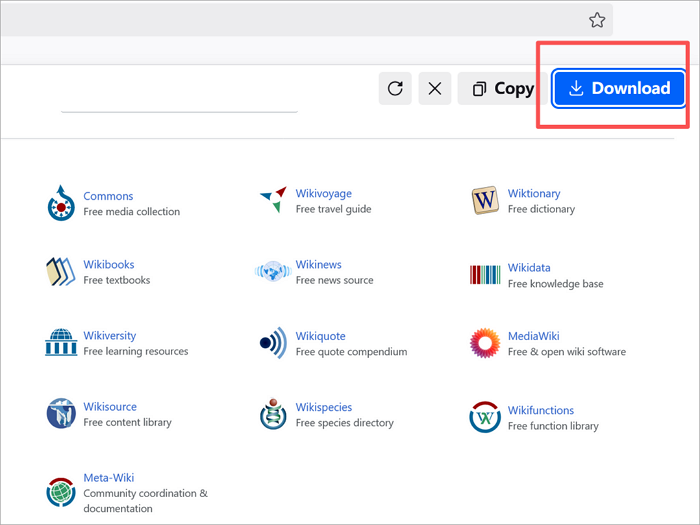
Step 5. Once the screenshot is captured, you’ll be prompted to either “Copy“ or “Download“ it to your computer.
Screen Capture with Scrolling via Microsoft Edge
What sets Edge apart from the two methods mentioned above is its Web Capture feature, which is deeply integrated into the browser and provides additional options such as annotating and sharing the screenshot immediately after capturing. This makes it especially useful for users who want to mark up content, highlight key sections, or quickly share annotated screenshots with others.
Another unique feature is the ease of access. Edge’s Web Capture tool can be launched directly from the toolbar, the context menu, or even via keyboard shortcuts. This feature enables Windows 11 and 10 users to capture scrolling screenshots without leaving the browser in multiple ways.
💡 Follow this tutorial on screen capture of scrolling Windows 11/10 computers to get the whole-page screenshots you need:
Step 1. Launch Microsoft Edge and go to the webpage you want to capture.
Step 2. Access the Web Capture tool by either right-clicking anywhere on the webpage and selecting Screenshot, pressing Ctrl + Shift + S, or clicking the three-dot menu in the top-right corner and choosing Screenshot from the drop-down menu.
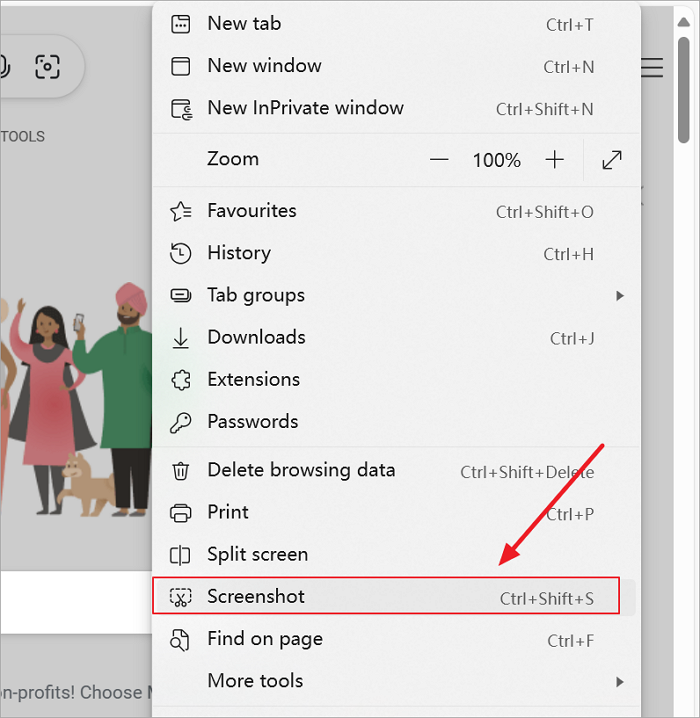
Step 3. In the Web Capture interface, select Capture full page to take a scrolling screenshot of the entire webpage.

Step 4. Once the screenshot is captured, you can view it directly in Edge and use the built-in annotation tools to highlight or add notes if needed.
Step 5. After making any edits, save the screenshot to your device, copy it, or share it directly from Edge using the available options.
Scrolling Screenshot Windows 10/11 Without a Browser
All the browser-based methods we’ve discussed are great for capturing full webpages, but sometimes you may need to capture more than just a webpage. For example, you might want to take a long screenshot of a full chat in messaging software, a PDF opened in a specific PDF viewer, a long spreadsheet, or even a lengthy email thread. In these situations, a powerful third-party tool is necessary to capture the entire content seamlessly.
Chill Recorder is one of the best choices for screen capture scrolling on Windows 11 and 10 without using an Internet Browser. It not only allows you to capture full-page screenshots beyond the browser but also comes with a built-in annotation tool. You can add arrows, text, or notes directly onto your screenshot, and even apply a mosaic effect to obscure sensitive information. It supports both automatic scrolling mode and manual scrolling screenshot mode, giving you flexibility depending on the content you want to capture.
Let’s capture a whole page of screenshots step by step using Chill Recorder:
Step 1. Install and launch Chill Recorder on your computer.
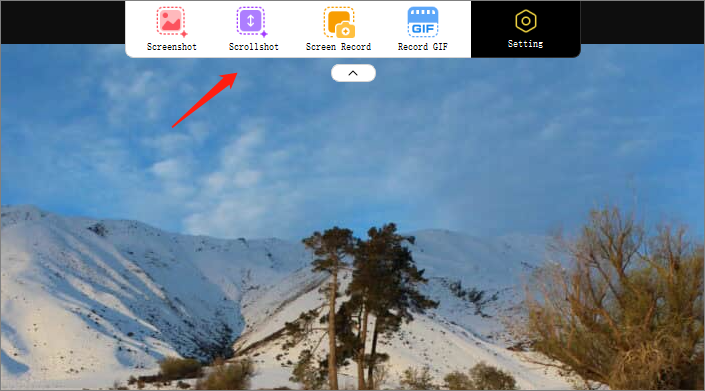
Step 2. Choose the “Scrollshot” option from the toolbar at the top of your screen by clicking it once.
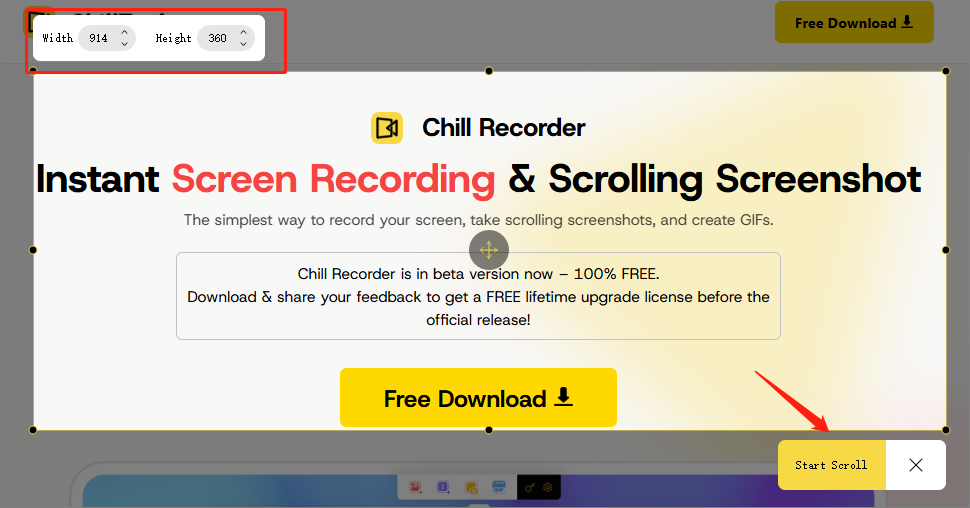
Step 3. Drag the mouse to select the first screen you want to capture. And the width of the first screen will be applied to the whole scrolling screenshot.
Step 4. When the “Start Scroll” button appears in the bottom right corner of the screenshot, click it and then scroll the mouse wheel to navigate the area you want to capture.
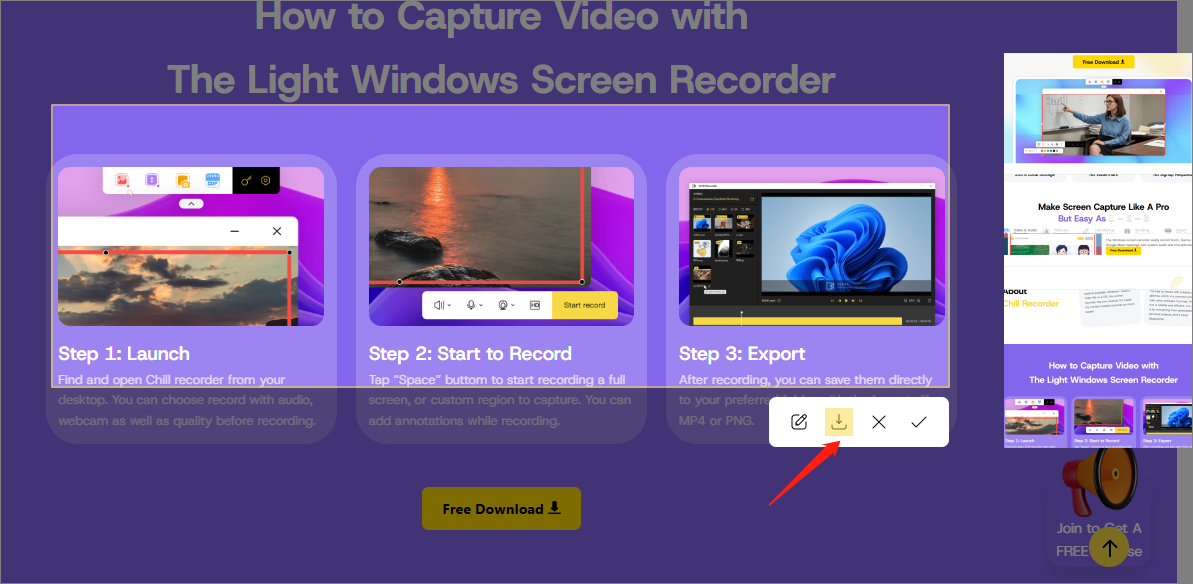
Step 5. Until the end of the area you need to screenshot, click on the “Download” icon to save the scrolling screenshot to your computer.
How to Take Full-Page Screenshots on Mac
macOS provides a built-in Screenshot toolbar for users running macOS Mojave or newer, which can be used to capture full-page screenshots. One of the benefits of this tool is the ability to zoom in and out on a webpage to adjust the capture area.
By zooming out, you can fit the entire page within your screen, making it easier to capture content that extends beyond the visible portion. However, it may not be as flexible as other methods for capturing content outside the browser (such as chats or PDFs), which would require third-party tools on macOS.
💡 Follow these steps to take long screenshots on Mac:
Step 1. Open the webpage you want to capture in your browser.
Step 2. Zoom out the webpage by holding Command and pressing the Minus (-) key to make the entire page visible. You can zoom back in by holding Command and pressing the Plus (+) key if necessary.
Step 3. To capture the entire screen, press Shift + Command + 3. This will take a screenshot of everything visible on your screen, including the webpage.
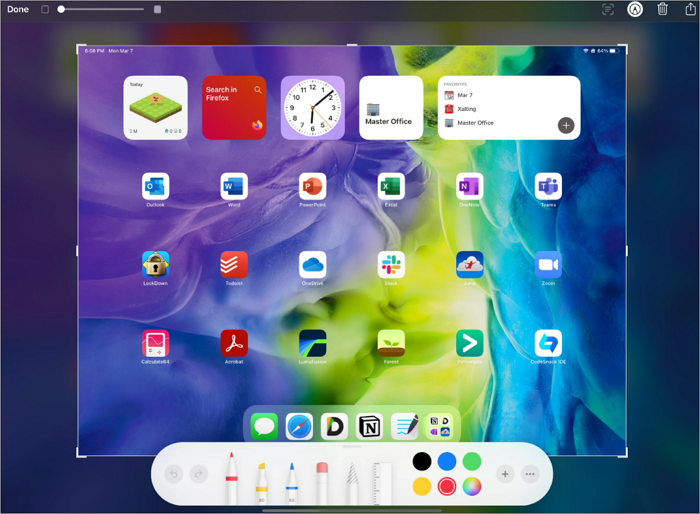
Image Credit from Reddit
Step 4. The screenshot will automatically be saved to your default location (usually the desktop). You can then view, edit, or share the screenshot as needed.
How to Take a Long Screenshot on iPhone and Android
Both iPhone and Android allow you to take long or scrolling screenshots directly from the device. Let’s explore how these tools work and how you can use them to capture content efficiently on your smartphone.
Take Full-Page Screenshots on iPhone
It’s effortless for iPhone users to capture a full webpage, PDF, or email, thanks to the full-page screenshot feature, available on devices running iOS 13 or later.
However, it’s worth noting that the screenshot is stored as a PDF in your Files app. If you need something other than a PDF, such as a JPG or PNG image, you’ll have to use a PDF-to-image conversion tool to change the format.
💡 Follow this tutorial to capture a long screenshot on your iPhone step by step:
Step 1. Open Safari, Mail, or another supported app, and navigate to the page or content you want to capture.
Step 2. Take a regular screenshot by pressing the Side button + Volume Up (on Face ID models) or the Side/Top button + Home button (on Touch ID models).
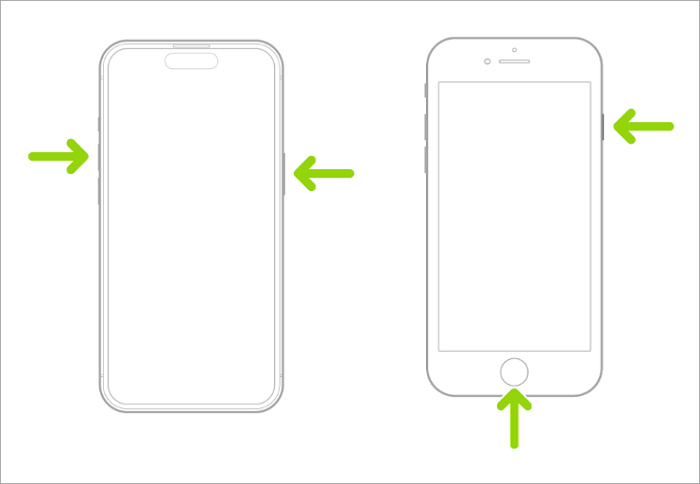
Image Credit from Apple Community
Step 3. Tap the preview thumbnail that appears in the bottom-left corner before it disappears.
Step 4. At the top of the screen, select the Full Page option. This will capture the entire scrollable content instead of just the visible portion.
Step 5. Tap Done, then choose Save PDF to Files. The full-page screenshot will be stored in your Files app.
Capture Full Screen on Android Phones
On Android devices, capturing a full-screen or scrolling screenshot is a little bit different from iPhones. While iOS saves full-page screenshots as PDF files in the Files app, most modern Android phones let you save scrolling screenshots directly as images (JPG or PNG). This makes them easier to share or insert into documents without conversion.
The method may vary slightly by brand-Samsung calls it Scroll Capture, while Google Pixel and other Android devices often label it as Extended Screenshot. Despite different names, the function is built into most phones running Android 11 or later.
💡 Let’s take a screenshot of a whole page on your Android phone:
Step 1. Open the page, chat, or document you want to capture, and position it at the top of the content.
Step 2. Take a screenshot by pressing Side (Power) + Volume Down briefly. (You can also use the palm-swipe gesture if that’s enabled in Settings → Advanced features.)
Step 3. A screenshot preview and toolbar appear at the bottom. Tap the Scroll capture / Capture more icon (usually a down-arrow or “Capture more“ label). Tap it repeatedly to extend the capture downward until you’ve included the area you want.
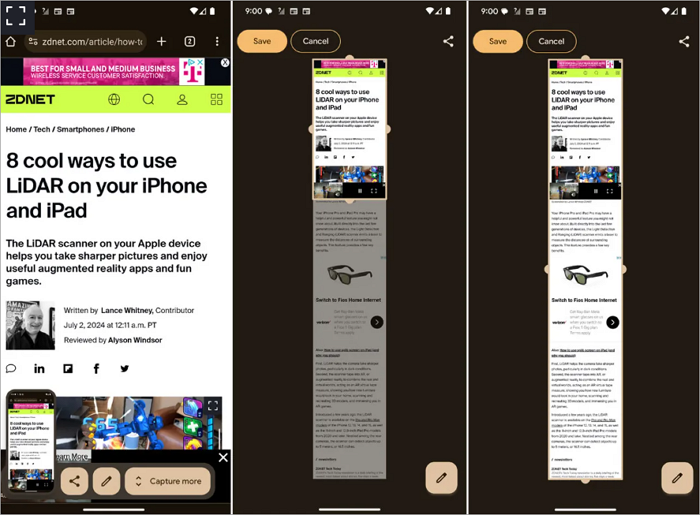
Image Credit from zdnet.com
Step 4. Tap Done or tap outside the toolbar to finish. The long screenshot is saved to Gallery → Screenshots (or the Photos app). From the preview, you can crop, annotate, or share the image.
Conclusion
In this guide, we covered multiple methods, from built-in tools on Windows 11/10, Mac, iPhone, and Android phones to reliable third-party apps like Chill Recorder. Windows users learned techniques for scrolling screen capture on Windows 10, using Chrome, Firefox, Edge, or standalone software for content beyond browsers. Mac and mobile users discovered device-specific methods.
By choosing the right method for your platform, you can efficiently capture complete content, maintain quality, and share or annotate it with ease.